Fun with Perl, Eyetoy and RaspberryPi
Author: Roberto De Ioris
Date: 20131207
Intro
This article is the result of various experiments aimed at improving uWSGI performance and usability on various area before the 2.0 release.
To follow the article you need:
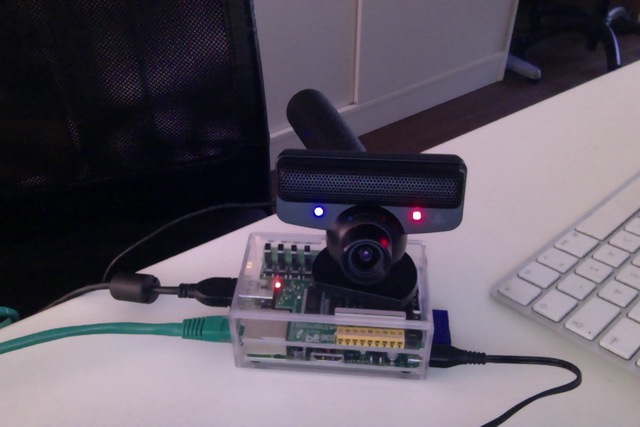
- a raspberrypi (any model) with a Linux distro installed (i have used the standard raspbian)
- an Eyetoy webcam (the PS3 one)
- a websockets enabled browser (basically any serious browser)
- a bit of perl knowledge (really a bit, the perl code is less than 10 lines ;)
- patience (building uWSGI+psgi+coroae on the rpi requires 13 minutes)
uWSGI subsystems and plugins
The project makes use of the following uWSGI subsystems and plugins:
- WebSocket supports
- SharedArea – share memory pages between uWSGI components (for storing frames)
- uWSGI Mules (for gathering frames)
- The Symcall plugin
- uWSGI Perl support (PSGI)
- uWSGI asynchronous/non-blocking modes (updated to uWSGI 1.9) (optional, we use Coro::Anyevent but you can rely on standard processes, albeit you will need way more memory)
What we want to accomplish
We want our rpi to gather frames from the eyetoy and stream them to the various connected clients using websockets (and a canvas to show them)
The whole system must use few memory, few cpu cycles and should support a big number of clients (well, even 10 clients will be a success for the raspberrypi hardware ;)
Technical background
The eyetoy captures frames in YUYV format (known as YUV 4:2:2). It means we need 4 bytes for 2 pixels.
By default the resolution is set to 640x480, so each frame will need 614400 bytes
Once we have a frame we need to decode it as RGBA to allow the HTML5 canvas to show it.
The translation between YUYV and RGBA is pretty heavy for the rpi (expecially if you need to do it for every connected client) so we will do it in the browser using javascript (well there are other approaches we can follow, just check the end of the article for them)
The uWSGI stack is composed by a mule gathering frames from the eyetoy and writing them to a sharedarea.
Workers constantly read from that sharedarea and send frames as websockets binary messages.
Let’s start: the uwsgi-capture plugin
uWSGI 1.9.21 introduced a simplified (and safe) procedure to build uWSGI plugins. (so expect more third party plugins soon).
The project at: https://github.com/unbit/uwsgi-capture
shows a very simple plugin using the video4linux 2 api to gather frames.
Each frame is written in a sharedarea initialized by the plugin itself.
The first step is getting uWSGI and building it with the ‘coroae’ profile:
sudo apt-get install git build-essential libperl-dev libcoro-perl
git clone https://github.com/unbit/uwsgi
cd uwsgi
make coroae
the whole procedure requires 13 minutes, if all goes well you can clone the uwsgi-capture plugin and build it
git clone https://github.com/unbit/uwsgi-capture
./uwsgi --build-plugin uwsgi-capture
you now have the capture_plugin.so file in your uwsgi directory.
Plug your eyetoy to a usb port on your rpi and check if it works:
./uwsgi --plugin capture --v4l-capture /dev/video0
(the –v4l-capture option is exposed by the capture plugin)
If all goes well you should see the following lines in uWSGI startup logs:
/dev/video0 detected width = 640
/dev/video0 detected height = 480
/dev/video0 detected format = YUYV
sharedarea 0 created at 0xb6935000 (150 pages, area at 0xb6936000)
/dev/video0 started streaming frames to sharedarea 0
(the sharedarea memory pointers could be obviously different)
the uWSGI process will exit soon after them as we did not tell it what to do :)
The uwsgi-capture plugin exposes 2 functions:
captureinit() -> mapped as the init() hook of the plugin, it will be called automatically by uWSGI. If –v4l-capture option is specified, this function will initialize the specified device and will map it to a uWSGI sharedarea.
captureloop() -> this is the function gathering frames and writing them to the sharedarea. This function should constantly run (even if there are no clients reading frames)
We want a mule to run the captureloop() function:
./uwsgi --plugin capture --v4l-capture /dev/video0 --mule="captureloop()" --http-socket :9090
this time we have bound uWSGI to http port 9090 with a mule mapped to the “captureloop()” function. This mule syntax is exposed by the symcall plugin that take control of every mule argument ending with “()” (the quoting is required to avoid the shell making mess with parenthesis)
If all goes well you should see your uWSGI server spawning a master, a mule and a worker.
Step 2: the PSGI app
Time to write our websockets server sending eyetoy frames (you can find sources for the example here: https://github.com/unbit/uwsgi-capture/tree/master/rpi-examples).
The PSGI app will be very simple:
use IO::File;
use File::Basename;

my $app = sub {
     my $env = shift;

     # websockets connection happens on /eyetoy
     if ($env->{PATH_INFO} eq '/eyetoy') {
             # complete the handshake
             uwsgi::websocket_handshake($env->{HTTP_SEC_WEBSOCKET_KEY}, $env->{HTTP_ORIGIN});
             while(1) {
                     # wait for updates in the sharedarea
                     uwsgi::sharedarea_wait(0, 50);
                     # send a binary websocket message directly from the sharedarea
                     uwsgi::websocket_send_binary_from_sharedarea(0, 0)
             }
     }
     # other requests generate the html
     else {
             return [200, ['Content-Type' => 'text/html'], new IO::File(dirname(__FILE__).'/eyetoy.html')];
     }
}
The only interesting parts are:
uwsgi::sharedarea_wait(0, 50);
this function suspend the current request until the specified sharedarea (the ‘zero’ one) gets an update. As this function is basically a poller, the second argument specifies the polling frequency (in milliseconds). 50 milliseconds gave us good results (feel free to try with other values).
uwsgi::websocket_send_binary_from_sharedarea(0, 0)
this is a special function sending a websocket binary message directly from the sharedarea (yes, zero-copy). The first argument is the sharedarea id (the ‘zero’ one) and the second is the position in the sharedarea to start reading from (zero again, as we want a full frame)
Step 3: HTML5
The html part (well it would be better to say the ‘javascript’ part) is very easy:
<html>
     <body>
             <canvas id="mystream" width="640" height="480" style="border:solid 1px red"></canvas>

             <script>


                     var canvas = document.getElementById('mystream');
                     var width = canvas.width;
                     var height = canvas.height;
                     var ctx = canvas.getContext("2d");
                     var rgba = ctx.getImageData(0, 0, width, height);

                     // fill alpha (optimization)
                     for(y = 0; y< height; y++) {
                             for(x = 0; x < width; x++) {
                                     pos = (y * width * 4) + (x * 4) ;
                                     rgba.data[pos+3] = 255;
                             }
                     }

                     // connect to the PSGI websocket server
                     var ws = new WebSocket('ws://' + window.location.host + '/eyetoy');
                     ws.binaryType = 'arraybuffer';
                     ws.onopen = function(e) {
                             console.log('ready');
                     };

                     ws.onmessage = function(e) {
                             var x, y;
                             var ycbcr = new Uint8ClampedArray(e.data);
                             // convert YUYV to RGBA
                             for(y = 0; y< height; y++) {
                                     for(x = 0; x < width; x++) {
                                             pos = (y * width * 4) + (x * 4) ;
                                             var vy, cb, cr;
                                             if (x % 2 == 0) {
                                                     ycbcr_pos = (y * width * 2) + (x * 2);
                                                     vy = ycbcr[ycbcr_pos];
                                                     cb = ycbcr[ycbcr_pos+1];
                                                     cr = ycbcr[ycbcr_pos+3];
                                             }
                                             else {
                                                     ycbcr_pos = (y * width * 2) + ((x-1) * 2);
                                                     vy = ycbcr[ycbcr_pos+2];
                                                     cb = ycbcr[ycbcr_pos+1];
                                                     cr = ycbcr[ycbcr_pos+3];
                                             }
                                             var r = (cr + ((cr * 103) >> 8)) - 179;
                                             var g = ((cb * 88) >> 8) - 44 + ((cr * 183) >> 8) - 91;
                                             var b = (cb + ((cb * 198) >> 8)) - 227;
                                             rgba.data[pos] = vy + r;
                                             rgba.data[pos+1] = vy + g;
                                             rgba.data[pos+2] = vy + b;
                                     }
                             }
                             // draw pixels
                             ctx.putImageData(rgba, 0, 0);
                     };
                     ws.onclose = function(e) { alert('goodbye');}
                     ws.onerror = function(e) { alert('oops');}
             </script>

     </body>
</html>
Nothing special here, the vast majority of the code is related to YUYV->RGBA conversion. Pay attention to set the websocket communication in ‘binary’ mode (binaryType = ‘arraybuffer’ is enough) and be sure to use a Uint8ClampedArray (otherwise performance will be terribly bad)
Ready to watch
./uwsgi --plugin capture --v4l-capture /dev/video0 --http-socket :9090 --psgi uwsgi-capture/rpi-examples/eyetoy.pl --mule="captureloop()"
connect with your browser to tcp port 9090 of your raspberrypi and start watching
Concurrency
While you watch your websocket stream, you may want to start another browser window to see a second copy of your video. Unfortunately you spawned uWSGI with a single worker, so only a single client can get the stream.
You can add multiple workers easily:
./uwsgi --plugin capture --v4l-capture /dev/video0 --http-socket :9090 --psgi uwsgi-capture/rpi-examples/eyetoy.pl --mule="captureloop()" --processes 10
in this way up to 10 people will be able to watch the stream
But coroutines are way better (and cheaper) for such I/O bound applications:
./uwsgi --plugin capture --v4l-capture /dev/video0 --http-socket :9090 --psgi uwsgi-capture/rpi-examples/eyetoy.pl --mule="captureloop()" --coroae 10
now we are able to manage 10 clients but with a single process !!! The rpi memory will be grateful to you.
Zero-copy all over the place
Why using the sharedarea ?
The sharedarea is one of the most advanced uWSGI features. If you give a look at the uwsgi-capture plugin you will see how it easily creates a sharedarea pointing to a mmap()’ed region. Basically each worker, thread (but please do not use threads with perl) or coroutine will have access to that memory in a concurrently-safe way.
In addition to this, thanks to the websocket-api -> sharedarea cooperation you can directly send websocket packets from a sharedarea without copying memory (except for the resulting websocket packet).
This is way faster than something like:
my $chunk = uwsgi::sharedarea_read(0, 0)
uwsgi::websocket_send_binary($chunk)
as we need to allocate the memory for $chunk at every iteration, copying the sharedarea content into it and finally encapsulating it in a websocket message.
With the sharedarea you remove the need to allocate (and free) memory constantly and to copy it from sharedarea to the perl vm.
Alternative approaches
There are obviously other approaches you can follow.
You could hack uwsgi-capture to allocate a second sharedarea in which it will directly write RGBA frames.
JPEG encoding is relatively fast, you can try encoding frames in the rpi and sending them as MJPEG frames (instead of using websockets):
my $writer = $responder->( [200, ['Content-Type' => 'multipart/x-mixed-replace; boundary=uwsgi_mjpeg_frame']]);
$writer->write("--uwsgi_mjpeg_frame\r\n");
while(1) {
    uwsgi::sharedarea_wait(0);
    my $chunk = uwsgi::sharedarea_read(0, 0);
    $writer->write("Content-Type: image/jpeg\r\n");
    $writer->write("Content-Length: ".length($chunk)."\r\n\r\n");
    $writer->write($chunk);
    $writer->write("\r\n--uwsgi_mjpeg_frame\r\n");
}
Other languages
At the time of writing, the uWSGI PSGI plugin is the only one exposing the websockets+sharedarea additional api. The other languages plugins will be updated soon.
More hacking
The rpi board is really funny and uWSGI is a great companion for it (expecially its lower-level api functions).
As an exercise left to the reader: remember you can mmap() the address 0x0x20200000 to access the rpi GPIO controller...ready to write a uwsgi-gpio plugin ?